ご利用ガイド オブジェクトストレージを使う(Fluentd編)
目次
こちらのガイドではConoHaのオブジェクトストレージをFluentdを使って連携する方法をご紹介します。
Fluentdとは
Fluentdはオープンソースのログ収集ソフトウェアです。ログを加工したり、一台のサーバーに集約することができます。オブジェクトストレージに集約することで容量を節約したり、解析等に生かす事ができます。
Fluentdのインストール
まずは[yum]コマンドで必要なパッケージをインストール後に、Fluentdをインストールします。[td-agent]コマンドでバージョンが出力されたらインストールは完了しています。
(2019年5月21日時点のバージョン: 1.4.2)
コマンドの実行例としては以下のようになります。
$ yum install gcc -y
$ curl -L https://toolbelt.treasuredata.com/sh/install-redhat-td-agent3.sh | sh
$ systemctl status td-agent.service
● td-agent.service - td-agent: Fluentd based data collector for Treasure Data
   Loaded: loaded (/usr/lib/systemd/system/td-agent.service; disabled; vendor preset: disabled)
   Active: inactive (dead)
     Docs: https://docs.treasuredata.com/articles/td-agent

$ export PATH=$PATH:/opt/td-agent/embedded/bin
$ td-agent --version
td-agent 1.4.2
Fluentdの設定
上記でFluentdのインストールが完了したのでオブジェクトストレージと連携するためのプラグインを次のようにインストールします。
$ td-agent-gem install fluent-plugin-swiftFluentdをインストールした直後は設定ファイルにデフォルトの設定が記載してあるので、こちらをオブジェクトストレージと連携するための設定に変更します。
今回は/var/log/messagesをオブジェクトストレージに収集する設定をご紹介します。設定を変える事でNginxやApacheといったWebサーバー、Webアプリケーションのログも収集することができます。
$ cat << EOF > /etc/td-agent/td-agent.conf
<source>
  @type tail
  format syslog
  path /var/log/messages
  pos_file /var/log/td-agent/messages.pos
  tag var.log.messages
</source>

<match var.log.messages>
  @type swift

  auth_url "#{ENV['OS_AUTH_URL']}"
  auth_user "#{ENV['OS_USERNAME']}"
  auth_api_key "#{ENV['OS_PASSWORD']}"
  auth_tenant  "#{ENV['OS_TENANT_NAME']}"
  swift_container "#{ENV['FLUENTD_CONTAINER_NAME']}"

  swift_object_key_format %{hostname}_%{time_slice}.%{file_extension}
  time_slice_format %Y%m%d%H%M%S
  <buffer tag,time>
    @type file
    path /var/log/fluent/swift
    timekey 1m
    timekey_wait 1m
    timekey_use_utc true
  </buffer>
</match>
EOF
動作確認
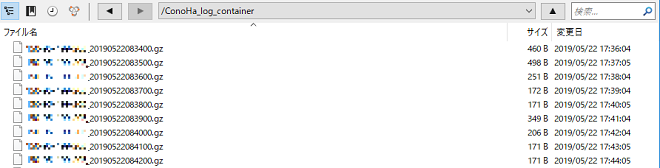
今回は動作確認をするためにCyberduckを使います。
Cyberduckの使い方についてはこちらを参考にしてください
まずは以下のように環境変数を指定します。
$ cat << EOF > /etc/sysconfig/td-agent
OS_AUTH_URL=https://identity.tyo1.conoha.io/v2.0/tokens
OS_USERNAME=gncuxxxxxxxx
OS_PASSWORD=xxxxxxxx
OS_TENANT_NAME=gnctxxxxxxxx
FLUENTD_CONTAINER_NAME=ConoHa_log_container
EOF| 項目 | 値 | 説明 |
|---|---|---|
| OS_AUTH_URL | identityのURL | |
| OS_USERNAME | APIユーザー名 | |
| OS_PASSWORD | APIパスワード | |
| OS_TENANT_NAME | テナント名 | |
| FLUENTD_CONTAINER_NAME | コンテナ名 | 使いたいコンテナ名、好きなものを設定可能 |
$ export $(cat /etc/sysconfig/td-agent)
$ td-agent
設定が正しく行えている場合は以下のように「fluentd worker is now running」と表示されます。

今回は動作確認のために1分間隔でログを保存する設定にしています。

設定が間違っている場合は以下のようにエラーが表示されますので、設定を再度ご確認ください。

動作確認ができたら実際に動かすために設定を戻して起動させます。/var/log/messagesはroot権限が必要なため、実行ユーザーをrootに変更しています。また、1分間隔ではなく60分間隔で保存する設定に変更しています。
$ sed -i -e "s/User=td-agent/User=root/" -e "s/Group=td-agent/Group=root/" /usr/lib/systemd/system/td-agent.service
$ sed -i -e "s/timekey 1m/timekey 60m/" -e "s/timekey_wait 1m/timekey_wait 10m/"  /etc/td-agent/td-agent.conf
$ systemctl enable td-agent.service --now
$ systemctl status td-agent.service以上がFluentdの利用についての一例となります。Fluentdの詳細については公式サイトやGitHubをご確認ください。
- 問題は解決できましたか?
-
お役立ち情報
ConoHaではサポートコンテンツの他にも以下のようなお役立ち情報をご用意しております。ぜひご活用ください。