ご利用ガイド 第11回:アナタだけに教えたい、Webサーバーのはじめの一歩
目次

第11回:アナタだけに教えたい、Webサーバーのはじめの一歩
こんにちは! 前々回 は、UNIXの歴史、前回 は、その中でもLinuxディストーションに注目して学習を進めてきました。そろそろ手を動かしたくなってきましたよね?そこで今回は、Webサーバーのインストール手順について説明をしていきたいと思います。
そもそも、Webサーバーとは何なのか?まず先に、以下の図をご覧ください。
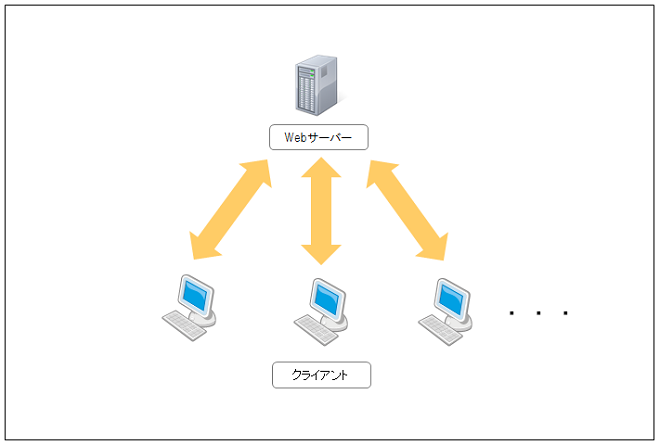
Webサーバーとは、みなさんが普段使っているパソコンのブラウザに対して、テキストや画像、動画など、様々な情報の表示を提供するコンピュータです。つまり、提供する側のことを「サーバー」と呼んでいて、みなさんが普段使っているパソコンのことを「クライアント」と呼んでいるだけで、中身はディスプレイが無いというところだけが違う、同じコンピューターなのです。
次に、Webサーバーのインストール手順について説明します。環境は、ConoHaのVPSのCentOS 6.5を使用します。
VPSの追加とログインまでは、第2回 を参考に行ってください。
1.Webサーバーのミドルウェアである、Apache(あぱっち)のインストール(yum)コマンドを実行します。
# yum -y install httpd
Loaded plugins: fastestmirror, security
Determining fastest mirrors
epel/metalink | 5.1 kB 00:00
* base: ftp.iij.ad.jp
* epel: ftp.riken.jp
* extras: ftp.iij.ad.jp
* updates: ftp.iij.ad.jp
base | 3.7 kB 00:00
base/primary_db | 4.4 MB 00:00
cr | 2.9 kB 00:00
cr/primary_db | 1.2 kB 00:00
epel | 4.4 kB 00:00
epel/primary_db | 6.3 MB 00:00
extras | 3.4 kB 00:00
extras/primary_db | 19 kB 00:00
updates | 3.4 kB 00:00
updates/primary_db | 4.7 MB 00:00
Setting up Install Process
Resolving Dependencies
―> Running transaction check
―> Package httpd.x86_64 0:2.2.15-30.el6.centos will be updated
―> Package httpd.x86_64 0:2.2.15-31.el6.centos will be an update
―> Processing Dependency: httpd-tools = 2.2.15-31.el6.centos for package: httpd-2.2.15-31.el6.centos.x86_64
―> Running transaction check
―> Package httpd-tools.x86_64 0:2.2.15-30.el6.centos will be updated
―> Package httpd-tools.x86_64 0:2.2.15-31.el6.centos will be an update
―> Finished Dependency Resolution

Dependencies Resolved

==========================================================================
Package Arch Version Repository Size
==========================================================================
Updating:
httpd x86_64 2.2.15-31.el6.centos updates 824 k
Updating for dependencies:
httpd-tools x86_64 2.2.15-31.el6.centos updates 73 k

Transaction Summary
==========================================================================
Upgrade 2 Package(s)

Total download size: 897 k
Downloading Packages:
(1/2): httpd-2.2.15-31.el6.centos.x86_64.rpm | 824 kB 00:00
(2/2): httpd-tools-2.2.15-31.el6.centos.x86_64.rpm | 73 kB 00:00
――――――――――――――――――
Total 4.6 MB/s | 897 kB 00:00
Running rpm_check_debug
Running Transaction Test
Transaction Test Succeeded
Running Transaction
Warning: RPMDB altered outside of yum.
Updating : httpd-tools-2.2.15-31.el6.centos.x86_64 1/4
Updating : httpd-2.2.15-31.el6.centos.x86_64 2/4
Cleanup : httpd-2.2.15-30.el6.centos.x86_64 3/4
Cleanup : httpd-tools-2.2.15-30.el6.centos.x86_64 4/4
Verifying : httpd-2.2.15-31.el6.centos.x86_64 1/4
Verifying : httpd-tools-2.2.15-31.el6.centos.x86_64 2/4
Verifying : httpd-2.2.15-30.el6.centos.x86_64 3/4
Verifying : httpd-tools-2.2.15-30.el6.centos.x86_64 4/4

Updated:
httpd.x86_64 0:2.2.15-31.el6.centos

Dependency Updated:
httpd-tools.x86_64 0:2.2.15-31.el6.centos

Complete!
上記のようなメッセージが表示されます。最後に「Complete!」の文字が表示されていれば、正常にインストールが完了した、ということです。
2.Webサーバー(Apache)を起動(startオプションで起動)します。
# /etc/rc.d/init.d/httpd start
Starting httpd: [ OK ]
ちなみに、再起動の場合は「restart」オプションで実行します。
# /etc/rc.d/init.d/httpd restart
Stopping httpd: [ OK ]
Starting httpd: [ OK ]
同じく、停止する場合は「stop」オプションで実行します。
# systemctl start httpd3.Webサーバー(Apache)が起動しているかを確認します。
# ps -ef | grep httpd
root 1812 1 0 18:33 ? 00:00:00 /usr/sbin/httpd
apache 1814 1812 0 18:33 ? 00:00:00 /usr/sbin/httpd
apache 1815 1812 0 18:33 ? 00:00:00 /usr/sbin/httpd
apache 1816 1812 0 18:33 ? 00:00:00 /usr/sbin/httpd
apache 1817 1812 0 18:33 ? 00:00:00 /usr/sbin/httpd
apache 1818 1812 0 18:33 ? 00:00:00 /usr/sbin/httpd
apache 1819 1812 0 18:33 ? 00:00:00 /usr/sbin/httpd
apache 1820 1812 0 18:33 ? 00:00:00 /usr/sbin/httpd
apache 1821 1812 0 18:33 ? 00:00:00 /usr/sbin/httpd
4.OS起動時に、Webサーバー(Apache)も起動するように設定します。
# chkconfig httpd onCentOS 7.0の場合、以下の起動コマンドを使用します。
# systemctl enable httpd
5.外部からブラウザでアクセスできるように、iptables(あいぴーてーぶるず)というIPフィルタの80番(HTTP)のポートを開けます。
※ここで注意!このIPフィルタの設定を誤ると、あんずちゃんの様に、悪い人にサーバーが乗っ取られる可能性があるので、しっかりと確認をしてください。デフォルトの設定で開いているSSH(22番)ポートが、もし不要であればポートを閉じて(「iptables -D」で削除して)ください。
5.1.現在の設定を確認します。
# iptables -L ?line-numbers
Chain INPUT (policy ACCEPT)
num target prot opt source destination
1 ACCEPT all ― anywhere anywhere state RELATED,ESTABLISHED
2 ACCEPT icmp ― anywhere anywhere
3 ACCEPT all ― anywhere anywhere
4 ACCEPT tcp ― anywhere anywhere state NEW tcp dpt:ssh
5 REJECT all ― anywhere anywhere reject-with icmp-host-prohibited

Chain FORWARD (policy ACCEPT)
num target prot opt source destination
1 REJECT all ? anywhere anywhere reject-with icmp-host-prohibited

Chain OUTPUT (policy ACCEPT)
num target prot opt source destination
5.2.iptablesのIPフィルタの80番(HTTP)のポートを開けるコマンドを実行します。
# iptables -I INPUT 5 -m state ?state NEW -m tcp -p tcp ?dport http -j ACCEPT5.3.iptablesの設定が正しく変更されているかを確認します。
# iptables -L ?line-numbers
Chain INPUT (policy ACCEPT)
num target prot opt source destination
1 ACCEPT all ― anywhere anywhere state RELATED,ESTABLISHED
2 ACCEPT icmp ― anywhere anywhere
3 ACCEPT all ― anywhere anywhere
4 ACCEPT tcp ― anywhere anywhere state NEW tcp dpt:ssh
5 ACCEPT tcp ― anywhere anywhere state NEW tcp dpt:http
6 REJECT all ― anywhere anywhere reject-with icmp-host-prohibited

Chain FORWARD (policy ACCEPT)
num target prot opt source destination
1 REJECT all ? anywhere anywhere reject-with icmp-host-prohibited

Chain OUTPUT (policy ACCEPT)
num target prot opt source destination
5.4.iptablesの設定を保存します。
# service iptables save
iptables: Saving firewall rules to /etc/sysconfig/iptables:[ OK ]
5.5.iptablesを再起動します。
# service iptables restart
iptables: Setting chains to policy ACCEPT: filter [ OK ]
iptables: Flushing firewall rules: [ OK ]
iptables: Unloading modules: [ OK ]
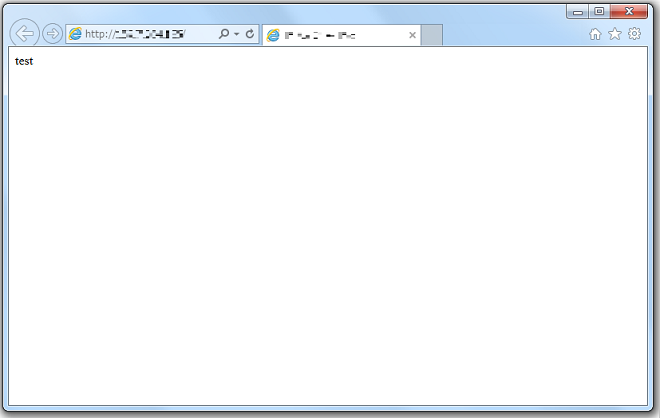
iptables: Applying firewall rules: [ OK ]6.みなさんがお使いのパソコンのブラウザで、Webサーバーにあるファイルが表示できるかを確認するための、テストファイル(index.html)を作成します。その後にファイルが正常に作成されているかも確認します。
# echo test >> /var/www/html/index.html
# cat /var/www/html/index.html
test
7.ブラウザでWebサーバーにあるテストファイル(index.html)を表示します。VPSのIPアドレスを、ブラウザに「 http://”VPSのIPアドレス”/ 」と入力してください。ブラウザに「test」という文字が表示されれば、Webサーバーが正常に機能している、ということになります。
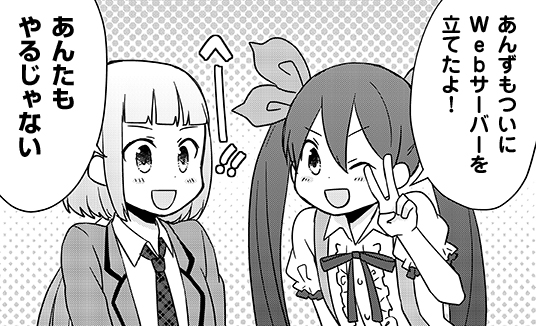
以上が、Webサーバーのインストールと、起動・再起動・停止の手順となります。はじめのうちは、コマンドに慣れずに時間が掛かったり、表示がとっつきにくいかもしれませんが、1つ1つの中身を理解していくと面白くなってきて、さらにこんなことはできないのかな?という好奇心に繋がっていきます。ぜひ、あなたもトライしてくださいね。
今回はここまで!では、また次回お会いしましょう!
- 問題は解決できましたか?
-
お役立ち情報
ConoHaではサポートコンテンツの他にも以下のようなお役立ち情報をご用意しております。ぜひご活用ください。