ご利用ガイド 第11回:アナタだけに教えたい、Webサーバーのはじめの一歩
目次


第11回:アナタだけに教えたい、Webサーバーのはじめの一歩
こんにちは! 前々回 は、UNIXの歴史、前回 は、その中でもLinuxディストーションに注目して学習を進めてきました。そろそろ手を動かしたくなってきましたよね?そこで今回は、Webサーバーのインストール手順について説明をしていきたいと思います。
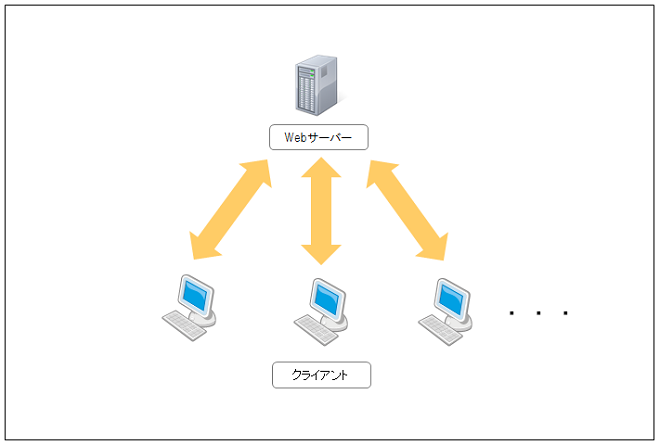
そもそも、Webサーバーとは何なのか?まず先に、以下の図をご覧ください。

Webサーバーとは、みなさんが普段使っているパソコンのブラウザに対して、テキストや画像、動画など、様々な情報の表示を提供するコンピュータです。つまり、提供する側のことを「サーバー」と呼んでいて、みなさんが普段使っているパソコンのことを「クライアント」と呼んでいるだけで、中身はディスプレイが無いというところだけが違う、同じコンピューターなのです。
次に、Webサーバーのインストール手順について説明します。環境は、ConoHaのVPSのCentOS 6.5を使用します。
VPSの追加とログインまでは、第2回 を参考に行ってください。
1.Webサーバーのミドルウェアである、Apache(あぱっち)のインストール(yum)コマンドを実行します。
# yum -y install httpd
Loaded plugins: fastestmirror, security
Determining fastest mirrors
epel/metalink | 5.1 kB 00:00
* base: ftp.iij.ad.jp
* epel: ftp.riken.jp
* extras: ftp.iij.ad.jp
* updates: ftp.iij.ad.jp
base | 3.7 kB 00:00
base/primary_db | 4.4 MB 00:00
cr | 2.9 kB 00:00
cr/primary_db | 1.2 kB 00:00
epel | 4.4 kB 00:00
epel/primary_db | 6.3 MB 00:00
extras | 3.4 kB 00:00
extras/primary_db | 19 kB 00:00
updates | 3.4 kB 00:00
updates/primary_db | 4.7 MB 00:00
Setting up Install Process
Resolving Dependencies
―> Running transaction check
―> Package httpd.x86_64 0:2.2.15-30.el6.centos will be updated
―> Package httpd.x86_64 0:2.2.15-31.el6.centos will be an update
―> Processing Dependency: httpd-tools = 2.2.15-31.el6.centos for package: httpd-2.2.15-31.el6.centos.x86_64
―> Running transaction check
―> Package httpd-tools.x86_64 0:2.2.15-30.el6.centos will be updated
―> Package httpd-tools.x86_64 0:2.2.15-31.el6.centos will be an update
―> Finished Dependency Resolution

Dependencies Resolved

==========================================================================
Package Arch Version Repository Size
==========================================================================
Updating:
httpd x86_64 2.2.15-31.el6.centos updates 824 k
Updating for dependencies:
httpd-tools x86_64 2.2.15-31.el6.centos updates 73 k

Transaction Summary
==========================================================================
Upgrade 2 Package(s)

Total download size: 897 k
Downloading Packages:
(1/2): httpd-2.2.15-31.el6.centos.x86_64.rpm | 824 kB 00:00
(2/2): httpd-tools-2.2.15-31.el6.centos.x86_64.rpm | 73 kB 00:00
――――――――――――――――――
Total 4.6 MB/s | 897 kB 00:00
Running rpm_check_debug
Running Transaction Test
Transaction Test Succeeded
Running Transaction
Warning: RPMDB altered outside of yum.
Updating : httpd-tools-2.2.15-31.el6.centos.x86_64 1/4
Updating : httpd-2.2.15-31.el6.centos.x86_64 2/4
Cleanup : httpd-2.2.15-30.el6.centos.x86_64 3/4
Cleanup : httpd-tools-2.2.15-30.el6.centos.x86_64 4/4
Verifying : httpd-2.2.15-31.el6.centos.x86_64 1/4
Verifying : httpd-tools-2.2.15-31.el6.centos.x86_64 2/4
Verifying : httpd-2.2.15-30.el6.centos.x86_64 3/4
Verifying : httpd-tools-2.2.15-30.el6.centos.x86_64 4/4

Updated:
httpd.x86_64 0:2.2.15-31.el6.centos

Dependency Updated:
httpd-tools.x86_64 0:2.2.15-31.el6.centos

Complete!
上記のようなメッセージが表示されます。最後に「Complete!」の文字が表示されていれば、正常にインストールが完了した、ということです。
2.Webサーバー(Apache)を起動(startオプションで起動)します。
# /etc/rc.d/init.d/httpd start
Starting httpd: [ OK ]
ちなみに、再起動の場合は「restart」オプションで実行します。
# /etc/rc.d/init.d/httpd restart
Stopping httpd: [ OK ]
Starting httpd: [ OK ]
同じく、停止する場合は「stop」オプションで実行します。
# systemctl start httpd3.Webサーバー(Apache)が起動しているかを確認します。
# ps -ef | grep httpd
root 1812 1 0 18:33 ? 00:00:00 /usr/sbin/httpd
apache 1814 1812 0 18:33 ? 00:00:00 /usr/sbin/httpd
apache 1815 1812 0 18:33 ? 00:00:00 /usr/sbin/httpd
apache 1816 1812 0 18:33 ? 00:00:00 /usr/sbin/httpd
apache 1817 1812 0 18:33 ? 00:00:00 /usr/sbin/httpd
apache 1818 1812 0 18:33 ? 00:00:00 /usr/sbin/httpd
apache 1819 1812 0 18:33 ? 00:00:00 /usr/sbin/httpd
apache 1820 1812 0 18:33 ? 00:00:00 /usr/sbin/httpd
apache 1821 1812 0 18:33 ? 00:00:00 /usr/sbin/httpd
4.OS起動時に、Webサーバー(Apache)も起動するように設定します。
# chkconfig httpd onCentOS 7.0の場合、以下の起動コマンドを使用します。
# systemctl enable httpd
5.外部からブラウザでアクセスできるように、iptables(あいぴーてーぶるず)というIPフィルタの80番(HTTP)のポートを開けます。
※ここで注意!このIPフィルタの設定を誤ると、あんずちゃんの様に、悪い人にサーバーが乗っ取られる可能性があるので、しっかりと確認をしてください。デフォルトの設定で開いているSSH(22番)ポートが、もし不要であればポートを閉じて(「iptables -D」で削除して)ください。
5.1.現在の設定を確認します。
# iptables -L ?line-numbers
Chain INPUT (policy ACCEPT)
num target prot opt source destination
1 ACCEPT all ― anywhere anywhere state RELATED,ESTABLISHED
2 ACCEPT icmp ― anywhere anywhere
3 ACCEPT all ― anywhere anywhere
4 ACCEPT tcp ― anywhere anywhere state NEW tcp dpt:ssh
5 REJECT all ― anywhere anywhere reject-with icmp-host-prohibited

Chain FORWARD (policy ACCEPT)
num target prot opt source destination
1 REJECT all ? anywhere anywhere reject-with icmp-host-prohibited

Chain OUTPUT (policy ACCEPT)
num target prot opt source destination
5.2.iptablesのIPフィルタの80番(HTTP)のポートを開けるコマンドを実行します。
# iptables -I INPUT 5 -m state ?state NEW -m tcp -p tcp ?dport http -j ACCEPT5.3.iptablesの設定が正しく変更されているかを確認します。
# iptables -L ?line-numbers
Chain INPUT (policy ACCEPT)
num target prot opt source destination
1 ACCEPT all ― anywhere anywhere state RELATED,ESTABLISHED
2 ACCEPT icmp ― anywhere anywhere
3 ACCEPT all ― anywhere anywhere
4 ACCEPT tcp ― anywhere anywhere state NEW tcp dpt:ssh
5 ACCEPT tcp ― anywhere anywhere state NEW tcp dpt:http
6 REJECT all ― anywhere anywhere reject-with icmp-host-prohibited

Chain FORWARD (policy ACCEPT)
num target prot opt source destination
1 REJECT all ? anywhere anywhere reject-with icmp-host-prohibited

Chain OUTPUT (policy ACCEPT)
num target prot opt source destination
5.4.iptablesの設定を保存します。
# service iptables save
iptables: Saving firewall rules to /etc/sysconfig/iptables:[ OK ]
5.5.iptablesを再起動します。
# service iptables restart
iptables: Setting chains to policy ACCEPT: filter [ OK ]
iptables: Flushing firewall rules: [ OK ]
iptables: Unloading modules: [ OK ]
iptables: Applying firewall rules: [ OK ]
6.みなさんがお使いのパソコンのブラウザで、Webサーバーにあるファイルが表示できるかを確認するための、テストファイル(index.html)を作成します。その後にファイルが正常に作成されているかも確認します。
# echo test >> /var/www/html/index.html
# cat /var/www/html/index.html
test
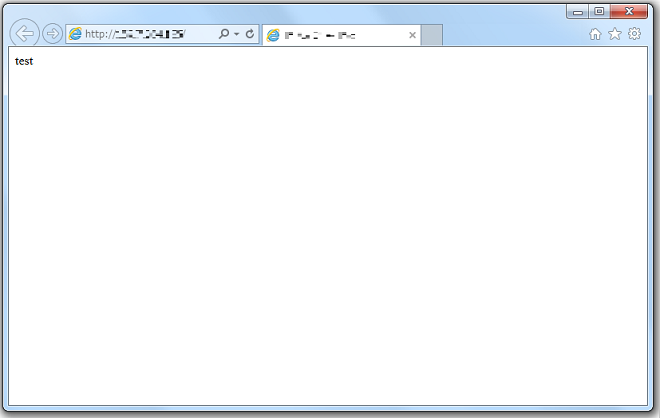
7.ブラウザでWebサーバーにあるテストファイル(index.html)を表示します。VPSのIPアドレスを、ブラウザに「 http://”VPSのIPアドレス”/ 」と入力してください。ブラウザに「test」という文字が表示されれば、Webサーバーが正常に機能している、ということになります。

以上が、Webサーバーのインストールと、起動・再起動・停止の手順となります。はじめのうちは、コマンドに慣れずに時間が掛かったり、表示がとっつきにくいかもしれませんが、1つ1つの中身を理解していくと面白くなってきて、さらにこんなことはできないのかな?という好奇心に繋がっていきます。ぜひ、あなたもトライしてくださいね。
今回はここまで!では、また次回お会いしましょう!
- 問題は解決できましたか?
-


